California Driving Test Score Sheet Breakdown
Passing the behind-the-wheel examination at the California DMV can feel intimidating, primarily because the grading criteria seem mysterious to many test-takers. However, the secret to passing lies in understanding the official grading document. Reviewing The Ultimate California Driving Test Score Sheet Breakdown gives you a clear roadmap of what examiners look for, how points are deducted, and what triggers an automatic failure.
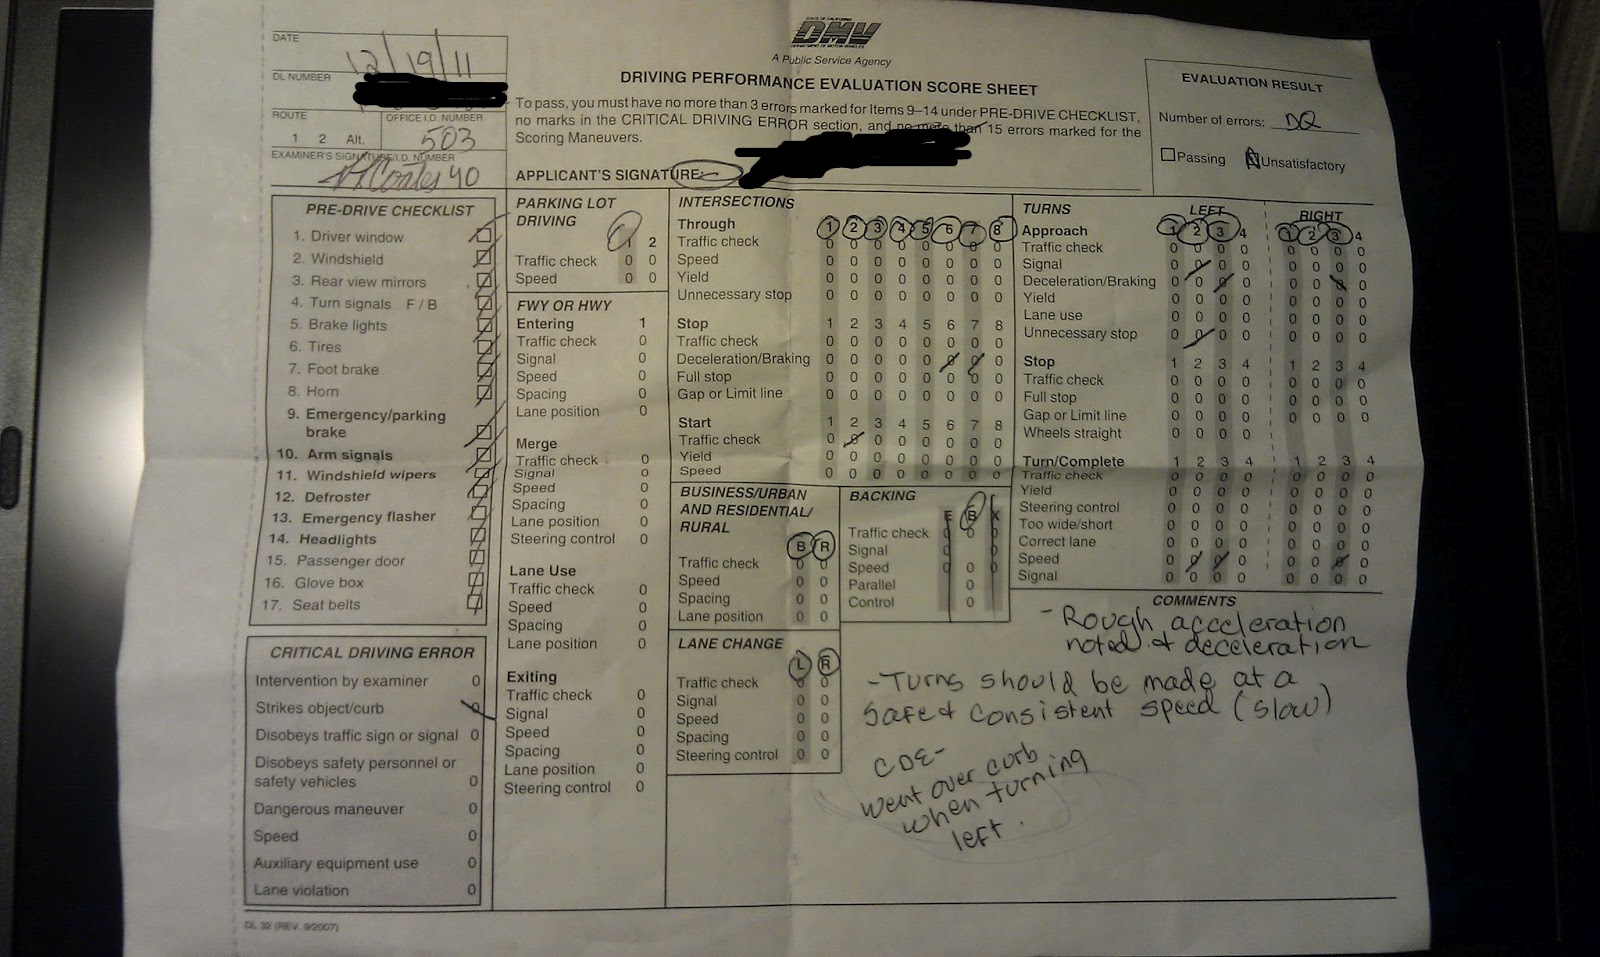
The California DMV uses a standardized form known officially as the DL 40. This document helps examiners record your driving behaviors objectively. Knowing how this sheet works removes the guesswork and allows you to practice targeted driving habits before your appointment.
Understanding the California DMV Score Sheet (DL 40)
When you step into the car with a DMV examiner, they attach a multi-colored score sheet to their clipboard. The form is divided into several specific sections, including pre-drive requirements, driving performance checks, and a scoring tally area at the bottom.
Examiners mark mistakes using hash marks or checkmarks next to specific categories. They categorize errors into two main types: driving errors (minor mistakes) and critical driving errors (automatic failures). Understanding the difference between these two categories is vital for keeping your score in the passing zone.
The Scoring Criteria and Point System
The California driving test is not based on a traditional 100-point percentage scale. Instead, you start with a clean slate, and errors accumulate against you. To pass the test, you must commit fewer than 16 total driving errors, and you cannot make any critical driving errors.
- Driving Errors (Minor Deductions): These are mistakes that do not immediately endanger other motorists or pedestrians, such as rolling slightly past a limit line, driving a few miles per hour too slow, or failing to check your blind spot once. Each minor error adds a tick mark to your score sheet.
- Critical Driving Errors (Automatic Failures): These are serious mistakes that force the examiner to intervene or create an immediate safety hazard. Committing even one critical error results in an instant fail, regardless of how well you drove the rest of the time.
Key Sections Evaluated on the Exam
The DL 40 score sheet tracks nearly every aspect of vehicle operation. Here are the primary operational categories your examiner will closely monitor:
1. Pre-Drive Checklist
Before the car even moves, you are graded on your knowledge of the vehicle's safety equipment. If you cannot demonstrate how to use these controls, the test may be canceled before it starts. You must correctly identify and operate:
- Windshield wipers
- Headlights and high beams
- Turn signals (left and right)
- Emergency flashers (hazard lights)
- Horn
- Foot brake and parking brake
- Defroster
You must also demonstrate proper hand placement on the steering wheel, fasten your seatbelt, and ensure all doors are securely closed.

2. Vehicle Movement and Control
Once you hit the road, the examiner watches how smoothly and safely you handle the physical controls of the car. This section covers acceleration, braking, steering, and clutch control (if driving a manual). Jerky stops, sudden acceleration, or wide turns will quickly accumulate minor tick marks.
3. Turns and Intersections
Intersections are high-risk zones where many test-takers lose points. The score sheet has dedicated sections for left and right turns. Examiners look for:
- Signaling at least 100 feet before the turn.
- Scanning cross-traffic, pedestrians, and mirrors.
- Yielding the right-of-way correctly.
- Staying in the proper lane (no cutting corners or wide swings).
4. Lane Management and Speed Control
You must maintain a safe speed that matches traffic flow without exceeding the posted speed limit. Driving too slowly when traffic permits can result in a deduction. Additionally, changing lanes requires a strict routine: mirror check, signal, blind spot check (looking over your shoulder), and smooth execution.
Automatic Failures: What to Avoid at All Costs
Even if you have zero minor errors, making a single critical driving error will end the test immediately. Examiners write these failures directly onto the bottom portion of the score sheet. Common automatic failures include:
- Examiner Intervention: If the examiner has to touch the steering wheel, grab the emergency brake, or step on a passenger-side brake pedal to prevent a crash.
- Traffic Law Violations: Running a red light or a stop sign (including rolling stops).
- Dangerous Maneuvers: Forcing another driver to brake or swerve to avoid hitting you.
- Speeding: Exceeding the speed limit in a school zone or residential area.
- Failure to Yield: Cutting off pedestrians or oncoming traffic during a left turn.
Tips for Passing the California Driving Test
Now that you know how the score sheet works, use these practical strategies to maximize your chances of success on test day:
- Exaggerate Your Head Movements: Examiners sit in the passenger seat and cannot always tell if your eyes are moving. When checking mirrors or blind spots, physically turn your head so the examiner clearly sees you doing it.
- Practice Complete Stops: Come to a complete, full stop behind the limit line before moving forward. Count to one-Mississippi in your head at every stop sign.
- Master Reverse Driving: The test almost always includes a backing-up maneuver. Practice backing straight for about 50 feet while looking over your right shoulder through the rear window, not just relying on backup cameras.
- Stay Calm After a Mistake: If you make a minor error, do not panic. Dwelling on a mistake increases your chances of making a critical one. Shake it off and focus entirely on the rest of the drive.
By preparing with the California driving test score sheet breakdown in mind, you can approach your DMV appointment with absolute confidence, eliminate costly habits, and drive away with your new license.