Chevy Traverse AC Recharge: Step-by-Step Guide
Chevy Traverse AC Recharge: How to Restore Cold Air

If the air conditioning in your midsize crossover is blowing lukewarm air on a hot summer day, you are likely dealing with low refrigerant levels. Performing a Chevy Traverse AC recharge is a straightforward DIY project that can save you a pricey trip to the mechanic. Modern vehicle air conditioning systems are closed loops, but over the years, microscopic leaks at O-rings, hoses, and fittings can cause refrigerant to slowly escape.
Before you rush to the auto parts store for a can of refrigerant, it helps to understand how the system works, what tools you need, and the critical safety precautions required when handling R-134a or R-1234yf refrigerant (depending on your model year).
Tools and Materials Needed
Gathering your supplies beforehand ensures the job goes smoothly. You do not need professional shop equipment, but you do need the right consumables and safety gear.
- Refrigerant kit with a pressure gauge (R-134a for 2008–2017 models, or R-1234yf for 2018 and newer models)
- Safety glasses and mechanic gloves
- An OBD-II scanner or digital thermometer (optional, for checking vent temperatures)
- A clean shop rag
Important Note: Always check the under-hood AC specification label near the radiator or latch to confirm which refrigerant your specific model year requires. Mixing refrigerants can severely damage the AC compressor.
Step-by-Step Chevy Traverse AC Recharge Guide
Follow these steps carefully to ensure you do not overcharge the system, which can be just as harmful as running it empty.
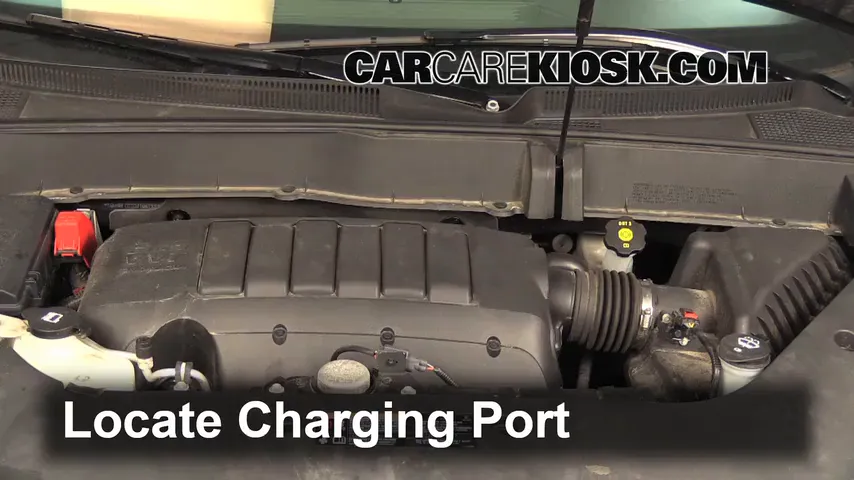
Step 1: Locate the Low-Pressure Service Port
Pop the hood of your Traverse and secure it. Locate the AC service ports. The system has two lines: the high-pressure line (usually smaller with a red cap) and the low-pressure line (larger with a black or blue cap). You will only attach your recharge hose to the low-pressure port.
On most Chevy Traverse generations, the low-pressure port is situated near the passenger side firewall or along the inner fender well, integrated into the aluminum AC lines.
Step 2: Prep the Car and AC System
Start the engine and turn on the air conditioning to prepare for the pressure reading.
- Turn the AC control to the coldest setting (usually 'Lo').
- Set the blower fan to its highest speed.
- Open all doors to allow the cabin heat to escape, ensuring the compressor stays engaged.
- Keep the engine running in a well-ventilated area (preferably outdoors).
Step 3: Measure the System Pressure
Video: A/C ReCharge Chevy Traverse 09 10 11 12 13 14 15 16 17 2009 2010 2011 2012 2013 2014 2015 2016 2017
Remove the plastic cap from the low-pressure port. Attach the quick-disconnect fitting from your refrigerant can hose to the port by pulling back the outer sleeve of the connector, pushing it firmly onto the valve, and releasing it. Check the gauge attached to the hose.

With the compressor running, read the pressure:
- Under 25 PSI: The system is low and needs a recharge.
- Between 35–45 PSI: The pressure is typically normal, depending on the ambient temperature.
- 0 PSI: The system has a major leak and will not hold a charge; recharging won't fix this without repairing the leak first.
Step 4: Add Refrigerant
If the gauge indicates low pressure, shake the refrigerant can thoroughly. Squeeze the trigger or twist the valve (depending on your specific dispenser design) to inject refrigerant into the system.
While adding refrigerant, keep these best practices in mind:
- Invert and shake the can gently every few seconds to keep the contents mixed.
- Add the refrigerant in short bursts (5 to 10 seconds at a time) rather than holding it wide open.
- Monitor the low-pressure gauge frequently to avoid overcharging.
Step 5: Test the Air Temperature
Once you are within the optimal pressure range (usually 35 to 40 PSI for typical warm days), release the trigger and disconnect the hose. Insert a thermometer into the center dash vent. You should notice the air cooling down significantly within two to three minutes.
Replace the plastic cap securely onto the low-pressure port to keep dirt and moisture out of the Schrader valve.
Troubleshooting Common Chevy Traverse AC Issues
If a standard recharge does not solve your warm-air problem, or if the AC blows cold for a few days and then warms up again, you are likely facing an underlying mechanical issue.
AC Clutch Not Engaging
If your AC compressor clutch fails to spin when you turn on the AC, the low-pressure safety switch may be preventing it from turning on because the system is completely empty, or there is an electrical issue with the AC relay or fuse.
Dual-Zone and Rear AC Complications
The Chevy Traverse is a large three-row SUV equipped with a rear climate control system, meaning it holds significantly more refrigerant than a standard sedan. If only the front vents blow cold while the rear blows warm—or vice versa—you may have a blend door actuator failure rather than a low refrigerant problem.
Conclusion
A DIY Chevy Traverse AC recharge is a rewarding maintenance task that restores comfort during brutal summer heatwaves. By verifying your refrigerant type, monitoring pressures carefully, and avoiding overcharging, you can have your SUV's air conditioning blowing ice-cold in under thirty minutes. If the problem persists, consult a certified mechanic to perform a dye test and locate stubborn leaks.