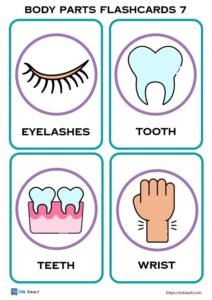
Create Your Own Body Part Flashcards With Ease
Learning human anatomy is a core milestone across multiple learning stages, from a toddler naming their nose to an ESL student mastering daily conversational English or a fifth-grader learning organ systems. While commercial decks exist, they often contain too much clutter, lack the exact vocabulary you need, or cost more than necessary. Fortunately, you can create your own body part flashcards with ease using accessible digital tools or everyday craft supplies.

Building your own card deck gives you full control over vocabulary depth, visual clarity, and learning adaptations such as bilingual labels or color coding. Here is your practical, step-by-step blueprint for designing durable, high-impact study cards in under an hour.
Why Custom Body Part Flashcards Work Better
Pre-printed educational decks are typically one-size-fits-all. When you design your own flashcards, you solve several common instructional challenges:
- Targeted Vocabulary: You pick exactly what to teach, whether that means five basic facial features for an eighteen-month-old or complex joints and organs for elementary science.
- Custom Visuals: Children and language learners respond best to clear, unambiguous imagery. You can use realistic photos, clean vector illustrations, or even photos of your learner to make the concepts stick.
- Multilingual Support: If you are teaching a second language, you can include target vocabulary in Spanish, French, Mandarin, or any other tongue alongside phonetic pronunciations.
- Cost Efficiency: Commercial educational decks often retail between $10 and $25. A DIY set costs pennies in paper and ink.
How to Create Your Own Body Part Flashcards With Ease
You do not need graphic design experience to make clean, professional-looking cards. Follow this five-step sequence to get your deck ready for the classroom or living room.
Step 1: Choose Your Vocabulary Level
Before launching an app or grabbing scissors, identify the learner's developmental stage. Grouping words logically prevents cognitive overload.
- Beginner (Ages 1–3): Eyes, ears, nose, mouth, hands, feet, belly, head.
- Intermediate / ESL Basics (Ages 4–7): Elbow, knee, shoulder, chin, neck, ankle, wrist, fingers, toes, back, teeth.
- Advanced / Primary Science (Ages 8+): Brain, heart, lungs, stomach, bones, muscles, joints, ribs.
Step 2: Source Clean, High-Contrast Images
Visual ambiguity is the biggest flaw in poorly designed flashcards. If an arrow points vaguely toward an arm, a student might guess elbow, wrist, or sleeve. Keep these design rules in mind:
- Use isolated images on solid white or light neutral backgrounds.
- Use bright arrows or circles to isolate specific areas (such as the heel or pinky finger) on a full limb.
- Find royalty-free photos or icons on platforms like Pixabay, Unsplash, or Wikimedia Commons. If you use Canva, search for "flat vector body parts" for consistent art styles.
Step 3: Select Your Layout Tool
Choose the tool that fits your current comfort level:
- Canva (Free & Recommended): Search for "Flashcard Template." Canva presets standard card sizes (typically 3" x 5" or 4" x 6") and lets you drag and drop icons, adjust fonts, and duplicate cards in seconds.
- Microsoft Word or Google Docs: Insert a table with 2 columns and 3 or 4 rows per page. Add your image in each cell and type the label below.
- Index Cards (No Tech Needed): Print out clip-art sheets, cut out the pictures, and glue them directly onto blank 3x5 index cards. Handwrite the labels on the reverse side.
Step 4: Format for Active Recall
Avoid putting the word directly under the image on the front of the card. When the answer is visible, the brain skips retrieval practice, creating an illusion of mastery. Instead, use one of these two proven layouts:
- Two-Sided Cards: Place the clean picture on the front. Place the capitalized word, phonetic spelling, and target-language translation on the back.
- Fold-Over Cards: Design a landscape layout where the label sits below the image with a dotted line in between. Fold the label underneath during practice so the student must guess before unfolding.
Step 5: Print, Cut, and Protect
Children handle flashcards roughly, and hands can be sticky. Standard 20lb printer paper will tear and wrinkle within days.
- Print on heavy cardstock (at least 65lb, ideally 110lb cover stock).
- Use a rotary paper trimmer or craft blade and metal ruler rather than scissors for straight, clean edges.
- Laminate the cards using 3-mil or 5-mil thermal laminating pouches. If you do not have a laminator, clear self-adhesive shelf liner or heavy-duty packing tape works well.
- Trim the corners with a corner-rounder punch to eliminate sharp plastic points.
Vocabulary Reference Decks by Learning Stage

Use these curated lists to build focused decks tailored to specific instructional goals.
Level 1: Everyday Basics (8 Cards)
Focus strictly on sensory and movement anchors:
- Head
- Eyes
- Ears
- Mose
- Mouth
- Hands
- Feet
- Tummy (or Belly)
Level 2: Extended Movement & Joints (12 Cards)
Ideal for kindergarten prep, early physical education, and beginner ESL:
- Shoulders
- Elbows
- Wrists
- Fingers
- Knees
- Ankles
- Toes
- Neck
- Chin
- Cheeks
- Back
- Chest
Level 3: Internal Organs & Biology (8 Cards)
Introduce these once external body parts are well understood:
- Brain (Nervous system)
- Heart (Circulatory system)
- Lungs (Respiratory system)
- Stomach (Digestive system)
- Skeleton / Bones (Support structure)
- Muscles (Movement)
- Kidneys (Filtration)
- Skin (Integumentary system)
Interactive Games to Reinforce Mastery
Flipping through cards at a desk quickly becomes monotonous. Turn your new deck into interactive play with these movement-based activities.
1. Touch and Match
Lay five to eight cards face-up on a carpet or low table. Call out a body part. The learner must physically touch their own body part first, then slap or grab the matching card. This connects tactile physical awareness to visual symbol recognition.
2. The Floor Obstacle Course
Tape laminated flashcards along a hallway or play area floor. As children jump, hop, or crawl from card to card, they must correctly call out the body part they land on. For older students, ask for the function (e.g., landing on "Lungs" requires saying "We breathe air with these!").
3. Body Part Bingo
Print a secondary grid of miniature icons on a single page for each player. Pull your large flashcards from an envelope one at a time. Learners cover the corresponding square with a marker or button until someone gets a complete row.
Final Thoughts
You do not need commercial publishing software or expensive educational subscriptions to create powerful learning aids. By choosing clear imagery, formatting for active recall, and printing on durable cardstock, you can produce a set of body part flashcards that lasts for years and directly addresses your learner's needs.