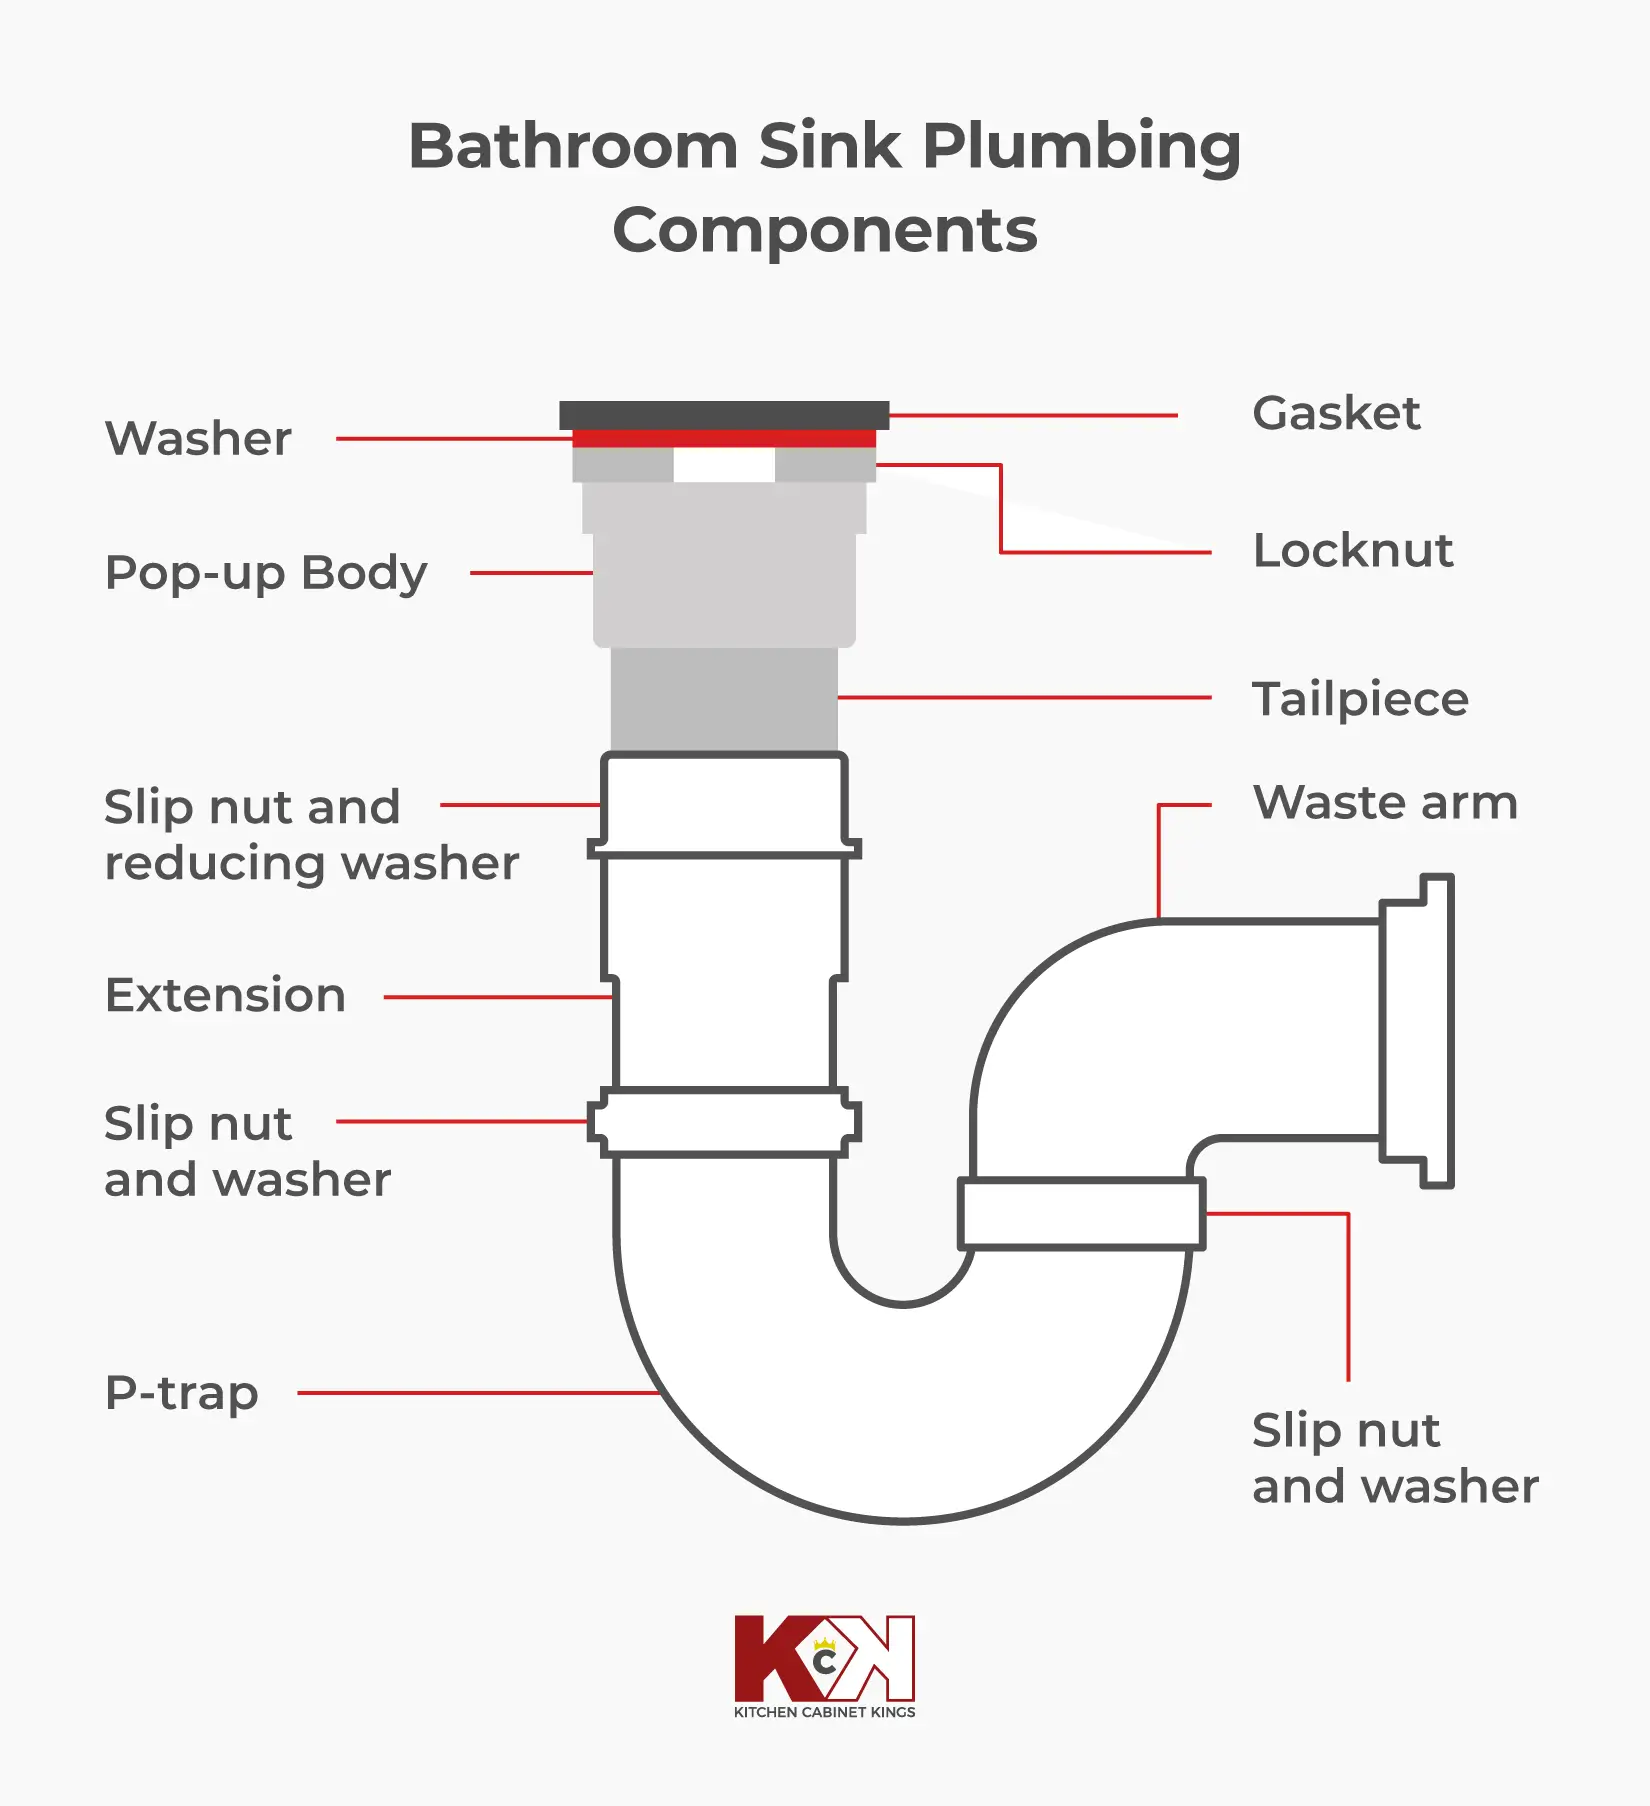
Diagram of a Sink Drain: Parts & Assembly Explained
Opening the cabinet beneath a bathroom or kitchen sink can feel like looking into a confusing maze of plastic and metal pipes. Whether you are troubleshooting a slow leak or planning a DIY plumbing repair, understanding the layout starts with a reliable diagram of a sink drain. Knowing how these components connect saves you time, money, and unnecessary frustration.

Understanding the Diagram of a Sink Drain
While different fixtures have unique variations, standard sink drainage systems follow a uniform path from the basin to the main home stack. Gravity does most of the heavy lifting, pulling wastewater down through a series of interlocking pipes and watertight seals.
As you look at a standard sink drain setup, the water travels downward from the top fixture into a vertical tailpiece, curves through a trap, and finally exits horizontally into the wall through a drain stub-out. Every piece plays a specific role in keeping your home free of water damage and unpleasant sewer gases.
Key Components of a Sink Drain Assembly
To make sense of any plumbing layout, you need to recognize the individual parts. Here are the core components that make up a standard sink drainage system:
- Sink Flange and Stopper: The visible metal or plastic rim fitted into the drain hole of the basin, often paired with a stopper mechanism.
- Tailpiece: A straight vertical pipe extending downward from the sink strainer or pop-up assembly.
- Slip Joint Nuts and Washers: Threaded plastic or metal rings combined with rubber washers that secure pipe connections together and prevent leaks.
- P-Trap: The U-shaped or curved section of pipe located directly beneath the basin.
- Trap Arm: The horizontal pipe that connects the P-trap to the sanitary tee or drain stub-out in the wall.
- Sanitary Tee / Vent Pipe: The T-shaped connector inside the wall that routes wastewater down to the main sewer line while allowing air to vent upward through the roof.
Step-by-Step Breakdown of the Drainage Path
Tracing the flow of water helps clarify why the system is designed the way it is. Here is how water moves through the assembly:
- Collection: Water pools in the basin and flows through the sink flange, passing the stopper and entering the tailpiece.
- Descent: The vertical tailpiece carries the water downward. In some setups, a branch tailpiece allows a dishwasher or double basin to tie into the same vertical drop.
- Trapping: Water fills the curved bottom of the P-trap before continuing onward. This standing water acts as a crucial liquid barrier that blocks sewer gases from rising up into your living space.
- Exit: After passing through the P-trap, the water moves horizontally along the trap arm and enters the wall drainage system.
Common Troubleshooting Areas
When leaks or clogs occur, they usually happen in specific areas of the drain assembly. Knowing the diagram helps you pinpoint the issue quickly.
Video: How Do P-Traps Work? | Spec. Sense

1. Leaking Slip Joints
If you notice a puddle under the cabinet, the culprit is often a loose slip joint nut or a degraded rubber washer. Over time, vibrations from running water can cause these nuts to loosen. Hand-tightening the slip joint nut usually resolves the issue, but if the rubber washer inside is cracked or brittle, you will need to replace it.
2. Clogged P-Traps
Hair, soap scum, and debris naturally settle at the lowest point of the P-trap. Fortunately, this is the easiest part of the system to service. By placing a bucket underneath, unscrewing the slip nuts on both sides of the trap, and removing the U-bend, you can manually clear out blockages without using harsh chemical drain cleaners.
3. Improper Venting Issues
If your sink gurgles when draining or drains sluggishly despite a clear trap, the issue may lie behind the wall in the vent stack. Proper air pressure is required for smooth drainage; without it, water can pull the water seal right out of the P-trap, leading to foul odors.
Tips for DIY Sink Drain Maintenance
Maintaining your sink drain requires minimal effort if done consistently. Avoid pouring grease, coffee grounds, or harsh chemicals down the drain, as these degrade rubber washers and corrode metal pipes. Periodically run hot water down the basin to dissolve minor soap build-up, and check the cabinet underneath every few months for early signs of moisture.
By keeping a clear mental image of how these pipes interlock—or referring back to a visual drain diagram whenever you work—you can tackle minor plumbing adjustments with confidence.