Discover Hidden Sharpness With This Tool
Few things are as frustrating in a kitchen, workshop, or garden shed as a dull blade. A dull knife slips on tomato skins, a dull chisel tears wood grain instead of cutting it, and a dull pruner crushes plant stems rather than making a clean cut. Most people assume their tools have simply reached the end of their lifespan, relegating them to the back of a drawer or tossing them into the trash.

However, the truth is that almost every dull blade is hiding an incredible edge just beneath its worn surface. To bring that edge back to life, you don't need years of blacksmithing experience or expensive professional services. You just need to discover hidden sharpness with this tool—the modern guided knife and tool sharpening system.
Why Traditional Sharpening Fails Most Users
For generations, freehand sharpening on a traditional whetstone was the gold standard. While undeniably effective in the hands of a master sushi chef or experienced woodworker, freehand sharpening has a steep learning curve. Maintaining a consistent angle—usually between 15 and 20 degrees—requires muscle memory, patience, and a steady hand.
When beginners try freehand stones, common mistakes happen:
- Inconsistent angles that round over the apex of the edge.
- Uneven pressure applied along the length of the blade.
- Giving up too early before reaching the burr-formation stage.
As a result, users often make their blades duller than when they started, leaving them discouraged. This is where guided sharpening systems change the game, removing human error from the equation and making professional-grade results accessible to everyone.
Anatomy of the Ultimate Precision Sharpener
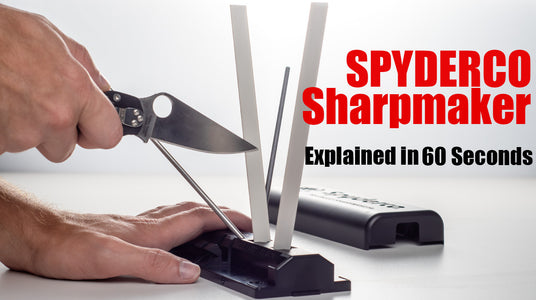
Modern guided sharpening systems typically consist of a secure base, a blade-clamping mechanism, and a pivoting guide rod that holds the abrasive stone at a fixed angle. This mechanical setup ensures absolute consistency with every single stroke.
The Clamping System
The foundation of any good guided sharpener is a robust clamp. This holds the blade rigidly in place so it cannot wobble or shift during the sharpening process. By locking the knife into a fixed position, you ensure that the abrasive stone hits the exact same bevel angle from the heel of the blade to the tip.
Abrasive Progression
To truly unlock a mirror polish and a surgical edge, these tools utilize a grit progression system. Much like sanding wood, you start rough and move to ultra-fine:
- Coarse Diamond Stones (200–400 grit): Used for repairing chipped edges, reprofiling damaged blades, or establishing a brand-new bevel.
- Medium Stones (600–800 grit): The workhorse grit that refines the scratch pattern and starts to create a true working edge.
- Fine and Ultra-Fine Stones (1000–3000+ grit): Polishing stones that remove micro-burrs and refine the apex to a microscopic point.
- Strops and Compounds: Leather or canvas strops loaded with diamond paste to achieve a razor-sharp, polished finish.
Step-by-Step: How to Unlock Your Blade's Potential
Using a precision guided sharpener is straightforward, but following the correct sequence ensures optimal results. Here is how to transform a dull, frustrating blade into a high-performance cutting instrument.
Step 1: Inspect and Clean the Blade
Before putting any metal to a stone, wipe down your knife or tool to remove old food residue, sap, or rust. Inspect the edge under a bright light to identify any major chips or dull spots that require extra attention during the coarse grinding phase.
Step 2: Secure and Set the Angle
Mount the blade securely in the clamp, ensuring it is centered. Set your desired sharpening angle on the guide rod. If you are unsure, a 20-degree angle is ideal for most everyday kitchen and pocket knives, while a 15-degree angle provides exceptional slicing performance for delicate culinary tasks.
Step 3: Establish the Burr
Start with your coarsest stone. Make light, sweeping strokes moving away from the spine toward the cutting edge. Continue until you feel a 'burr'—a tiny lip of displaced metal—form along the opposite side of the edge. Once the burr is present along the entire length, flip the blade and repeat the process on the other side.
Step 4: Refine and Polish
Progress to your medium and fine stones, repeating the process with progressively lighter pressure. The goal here is not to remove a lot of metal, but rather to refine the scratches left by the coarse stone and polish the apex until it is perfectly smooth.
Step 5: Strop to Perfection
Finish your work with a leather strop. This final step removes any lingering microscopic burrs and polishes the edge to a mirror-like finish, ensuring effortless cuts through paper, leather, or ingredients.
Maintaining Your Results
Once you have put in the initial work to restore your tools, maintenance becomes a breeze. You won't need to pull out the coarse stones every time your knife feels slightly sluggish. Instead, a quick touch-up on a fine ceramic rod or a few passes on a leather strop every couple of weeks will maintain that razor-sharp performance indefinitely.
Investing in a quality sharpening system pays for itself many times over. By extending the life of your favorite tools and knives, you save money while enjoying the satisfying, safe performance of a truly sharp edge. Take out your worn-out gear today, set up your sharpener, and experience the satisfaction of restoring peak performance to your tools.