Drawing Lunar Eclipses: A Step-by-Step Guide
There is something inherently magical about watching the full moon slip into Earth's shadow. The stark white orb slowly transforms into a glowing sphere of copper, rust, and crimson. Capturing this celestial phenomenon on paper allows you to freeze time, holding that fleeting cosmic alignment in your hands. If you want to create artwork that captures this wonder, this guide to drawing lunar eclipses that fascinate and inspire will walk you through the process from initial sketch to final highlight.

Understanding the Optics of a Lunar Eclipse
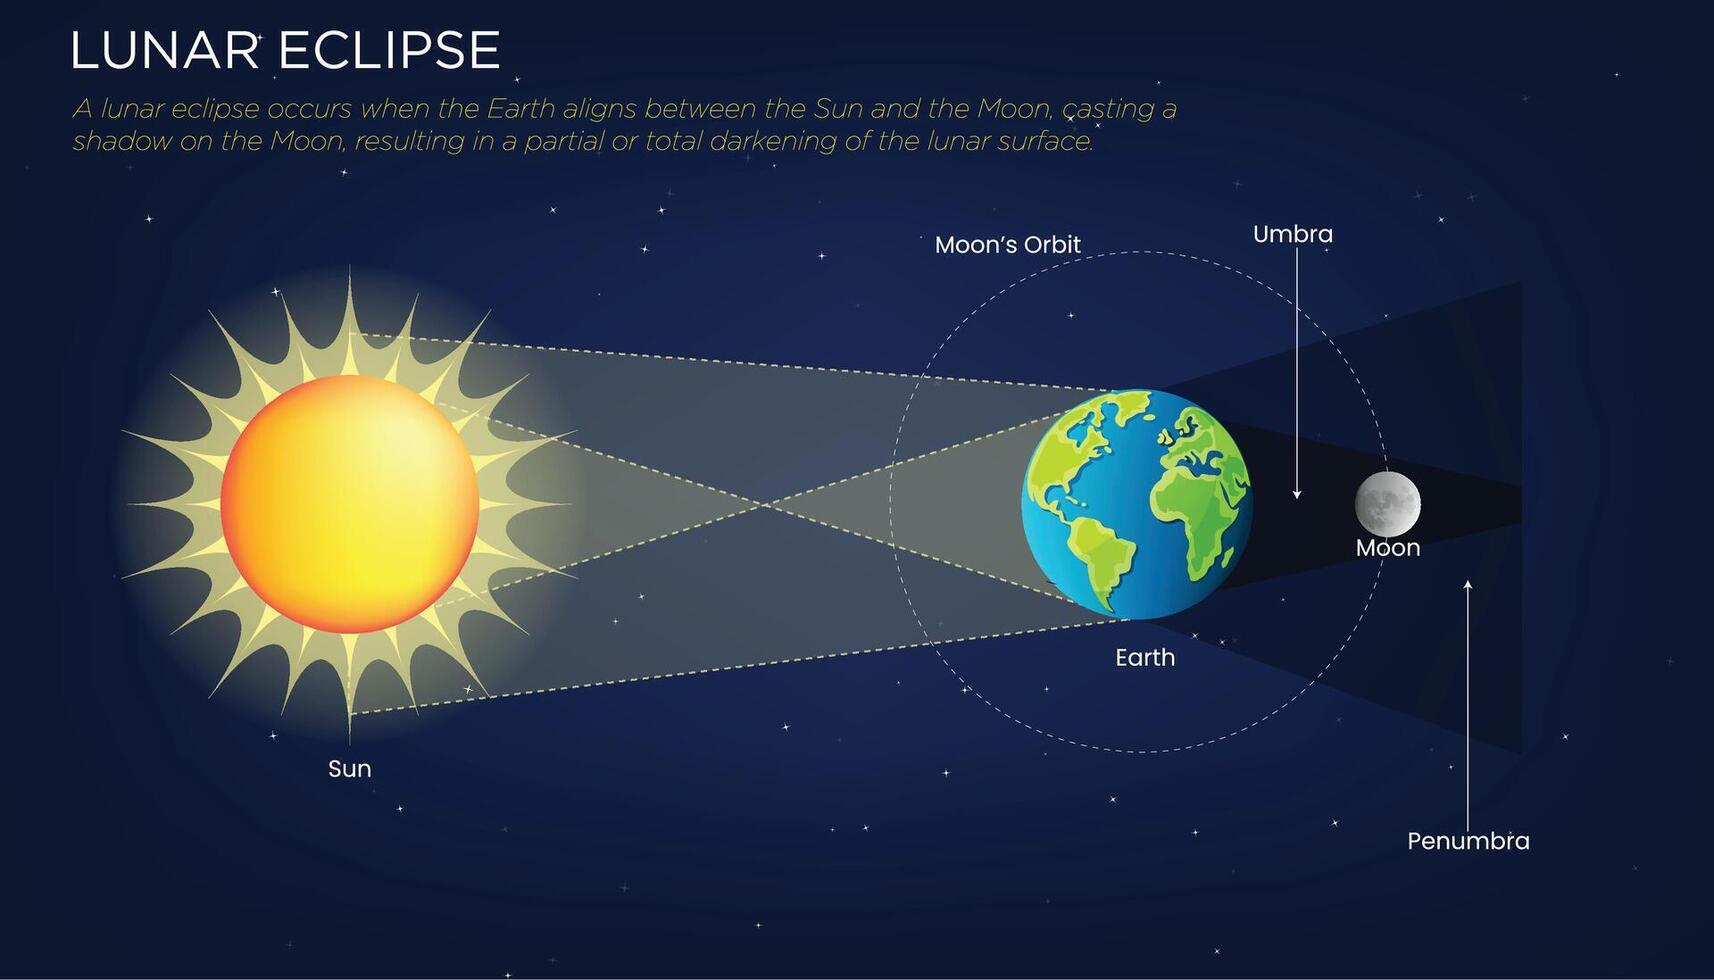
Before putting pencil to paper, it helps to understand what is actually happening in the night sky. A lunar eclipse occurs when the Earth moves directly between the Sun and the Moon, casting two distinct shadows: the penumbra (a lighter, outer shadow) and the umbra (the dark, central shadow).
As the Moon travels through the umbra, it doesn't go completely dark. Instead, sunlight passing through Earth's atmosphere is filtered and refracted. The shorter blue wavelengths scatter away, while the longer red wavelengths bend around the Earth and illuminate the lunar surface. This is why a totally eclipsed moon glows with a coppery hue—often referred to as a "Blood Moon."
Essential Tools and Materials
Your choice of medium will drastically change the mood of your drawing. While graphite is excellent for sketching, capturing the rich colors of an eclipse demands materials that can handle deep values and smooth transitions.
- Paper: Heavyweight black or dark grey pastel paper (like Canson Mi-Teintes). Starting on a dark surface allows the glowing highlights to pop instantly.
- Medium: Soft pastel sticks and pastel pencils offer the best blending capabilities for glowing gradients. Alternatively, colored pencils work well on toned grey paper.
- Blending Tools: Tortillions, soft makeup sponges, or your fingers for softening transitions between light and shadow.
- Reference Photos: NASA archives or amateur astrophotography provide accurate color references for the umbral gradient.
- Contrast is King: The dramatic beauty of an eclipse relies on the contrast between the deep, velvety black of space, the rich rust tones of the umbra, and the bright sliver of un-eclipsed moonlight (if you are drawing a partial phase).
- Embrace Softness: Earth's atmosphere creates a fuzzy boundary for its shadow. Avoid hard edges anywhere inside the eclipsed portion of the Moon.
- Layer Gradually: Building up rich colors in thin layers creates a luminous, glowing effect that solid, heavy applications simply cannot match.
Step-by-Step Drawing Process
1. The Initial Layout and Proportion
Start by drawing a perfect circle on your dark paper. You can use a compass or trace a round object. Lightly sketch the major lunar maria (the dark basaltic plains, such as Mare Imbrium and Mare Tranquillitatis). Even though the Moon will be in shadow, these permanent features must remain visible underneath the eclipse coloration to ensure the viewer recognizes it as our Moon.
2. Mapping the Shadow Line (The Terminator)
Video: Lunar Eclipse labeled diagram drawing/How to draw Lunar Eclipse diagram step by step
Unlike a standard moon phase where the terminator is a sharp, sunlit crescent, the edge of Earth's shadow is a soft, diffused gradient. Use a light grey or pale blue pencil to indicate where the penumbra meets the umbra. Keep your lines very soft; you will be blending this area extensively.
3. Laying Down the Deep Umbral Tones
The center of the Earth's shadow is the darkest part of the composition. Using deep maroons, burnt siennas, and dark indigos, block in the core of the shadow. Do not press too hard yet; you want to build up layers. Blend outward from the darkest zone toward the edge of the Moon, letting the colors fade gradually into a warm, coppery orange.
4. Adding Texture and Details
With your base colors established, begin refining the lunar topography. Use a sharp pastel pencil to lightly map out brighter crater rims, such as the prominent Tycho crater with its radiating rays. Remember that highlights inside the eclipsed portion of the Moon will be muted and tinted with the ambient light of the shadow—avoid pure stark whites here.
5. The Penumbral Glow and Stars
As the shadow transitions to the illuminated edge of the Moon, the color shifts to a pale, silvery grey or soft gold. Build up this rim carefully. To make your eclipse truly pop against the black background of space, add a faint, ethereal corona or atmospheric glow just outside the lunar limb using a barely-there dusting of white pastel. Finally, dot a few distant, twinkling stars in the surrounding space, keeping them subtle so they don't overpower the main subject.
Tips for Creating Dramatic Impact
To ensure your artwork moves beyond a simple scientific illustration and truly inspires your audience, keep these artistic principles in mind:
Drawing a lunar eclipse is a meditative exercise in patience, observation, and value control. By understanding the physics of Earth's shadow and utilizing rich, blendable mediums on dark paper, you can create a piece of art that captures the silent, breathtaking majesty of the cosmos right from your desk.