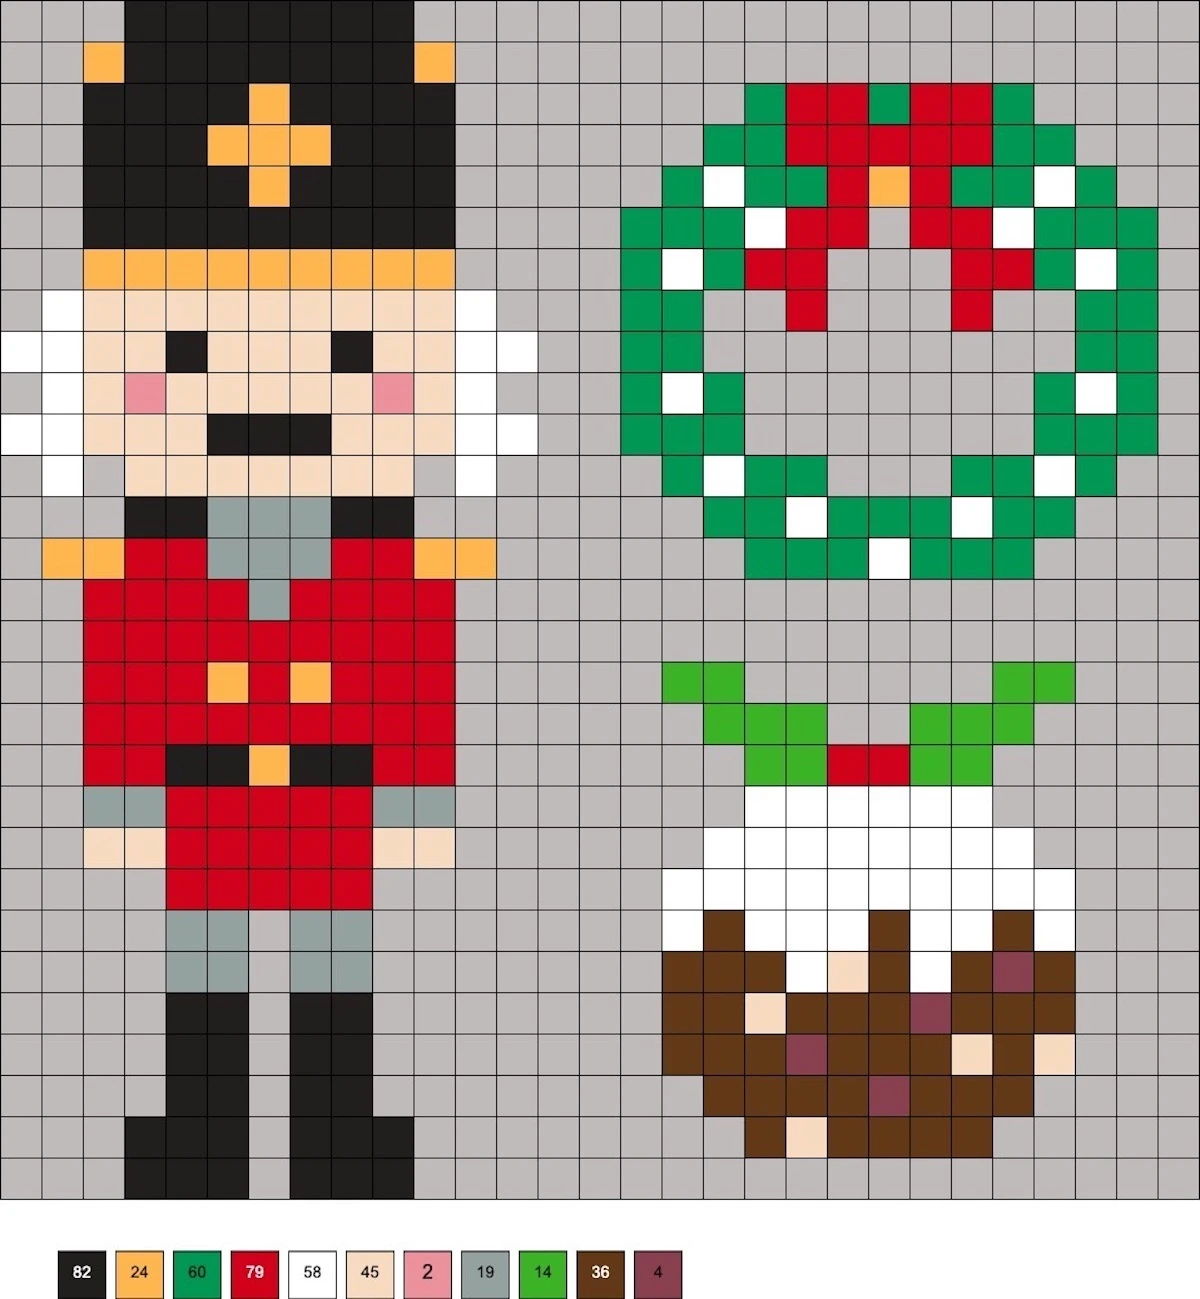
Festive Nutcracker Perler Bead Patterns to Craft
When the holiday season approaches, traditional decorations take center stage, and few symbols capture the magic of winter quite like the classic Christmas nutcracker. If you love fuse bead crafts, creating nutcracker perler bead patterns is a wonderful way to celebrate the season. Whether you want to make flat ornaments for your Christmas tree, magnets for the fridge, or 3D display pieces, these pixel-art designs offer a fun and engaging project for crafters of all ages.

Perler beads are inexpensive, easy to use, and fantastic for developing fine motor skills in children while providing a relaxing, nostalgic outlet for adults. In this guide, you will find color suggestions, sizing options, step-by-step assembly tips, and creative ideas for using your finished nutcracker designs.
Essential Supplies for Perler Bead Nutcrackers
Before you begin placing beads, gather your materials to ensure a smooth crafting session. Having the right tools makes ironing much easier and prevents ruined projects.
- Perler Beads: A standard assortment of holiday colors including red, white, blue, black, yellow or gold, flesh tone, and grey or silver.
- Pegboards: Large square interlocking pegboards work best for standard vertical nutcracker designs.
- Ironing Paper: Usually included with bead kits, but parchment paper works as a reliable substitute.
- Household Iron: Set to a medium heat setting without steam.
- Tweezers (Optional): Highly recommended for precise bead placement and fixing mistakes.
Classic Nutcracker Perler Bead Patterns
The traditional toy soldier nutcracker is instantly recognizable by his tall hat, bright uniform, and stoic expression. Here are two distinct ways to map out your design on a square pegboard.
The Traditional Red and Gold Guard
This classic design stands about 20 to 25 beads tall, making it a manageable project that yields a sturdy finished piece. Use a standard square pegboard and follow this column-by-column color guide from top to bottom:
- The Hat: Start with a solid block of black beads for the tall cylindrical hat. Add a single yellow bead in the center for the cap insignia, and a small white or grey plume on top.
- The Face: Use your choice of peach, tan, or light brown for the face. Add two black beads for the eyes and a simple line of black or brown for the mustache and beard. Nutcrackers are famous for their bold facial hair, so feel free to make the mustache prominent.
- The Uniform: Switch to bright red for the jacket. Use white or yellow beads to create decorative epaulets on the shoulders and vertical gold buttons down the front chest.
- The Belt and Pants: Create a black belt with a yellow buckle around the waist. Use white or blue beads for the trousers.
- The Boots: Finish the base with two solid blocks of black beads for the shiny riding boots.
The Sugar Plum Fairy Royal Guard (Blue Theme)
If you want a variation on the traditional red soldier, swap the primary colors to fit a winter wonderland aesthetic.
Video: How to Make Perler Beads Look Professional

- Replace the red jacket with royal blue or icy turquoise.
- Use metallic gold or yellow beads for elaborate frogging and chest details.
- Keep the boots and hat black, but accent the hat with a pink or purple feather to tie into the classic ballet theme.
Tips for Perfect Ironing and Assembly
Even the best nutcracker perler bead patterns can warp if the ironing step goes wrong. Follow these expert tips to ensure your holiday figures turn out flat, strong, and durable.
The Tape Method for Large Projects
Because nutcrackers are tall and skinny, they can easily slide or break apart as you carry your pegboard to the ironing station. To prevent this, try the masking tape method:
- Once your design is complete, press strips of low-tack painter's tape firmly across the top of the beads.
- Carefully peel the tape (along with the beads) off the plastic pegboard.
- Poke small holes through the tape over the center of each bead using a toothpick or a spare peg. This allows trapped air to escape while ironing.
- Place your ironing paper on top and iron directly over the tape. This method also saves your plastic pegboards from warping due to excessive heat.
Even Melting Techniques
Apply your iron in a gentle circular motion for about 10 to 20 seconds. Look through the translucent ironing paper to check that the outer edges of the beads have fused together. For tree ornaments, melt both sides for maximum durability. For display pieces you plan to mount, melting only one side keeps the back clean and crisp.
Creative Ways to Use Your Finished Nutcrackers
Once your fused bead nutcrackers have cooled under a heavy book to keep them flat, you can transform them into wonderful holiday crafts and gifts.
- Christmas Tree Ornaments: Attach a small metal screw-eye into the top of the hat, then loop a piece of festive ribbon or metallic cord through it.
- Holiday Gift Tags: Write the recipient's name on the back with a permanent marker and tie the nutcracker directly onto a wrapped present.
- Custom Magnets: Hot-glue a small ceramic magnet to the back of the finished piece to decorate your refrigerator or magnetic whiteboard all winter long.
- Garland String: Make a series of different colored nutcrackers and string them together horizontally to create a vibrant holiday garland for your mantel.
Crafting these nutcracker perler bead patterns is a delightful way to spend a chilly afternoon. With just a few basic colors and a little patience, you can build a whole army of festive guards to protect your home this holiday season.