Fix Your Appliance Fast with Roper Clothes Dryer Parts
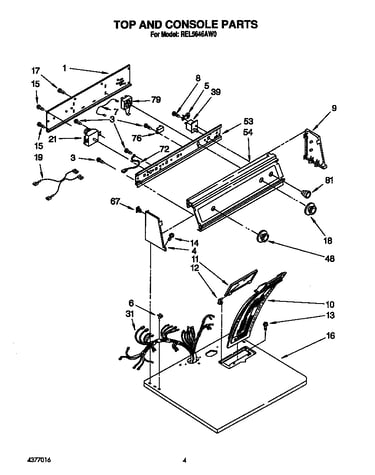
When your laundry routine grinds to a halt because a dryer stops heating or tumbling, buying a brand-new appliance isn't your only option. Often, a quick diagnostic check and a replacement component can bring the machine back to life. Sourcing reliable Roper clothes dryer parts is a straightforward, budget-friendly way to extend the lifespan of your appliance without paying hefty technician fees.

Roper appliances, manufactured by Whirlpool, are known for their reliable, no-nonsense design. Because they share many engineering traits with other Whirlpool-built brands, finding standard replacement components is usually simple. However, to get the repair right the first time, you need to know which part is failing, how to find its exact match, and how to install it safely.
Common Roper Dryer Problems and Replacement Parts
Before ordering any components, you need to identify the root cause of the breakdown. Different symptoms point directly to specific failed mechanisms inside your machine.
The Dryer Won't Start or Turn On
If pressing the start button produces silence, the issue is usually related to power delivery or safety switches.
- Thermal Fuse: A blown thermal fuse is the most common reason a Roper dryer won't start. This safety device trips when the dryer overheats. If it continuity-tests dead, you must replace it and investigate why the machine overheated in the first place.
- Door Switch: If the dryer door switch fails, the machine won't register that the door is closed securely, preventing the motor from engaging.
- Start Switch: Over time, the physical push-to-start switch can wear out internally, losing its electrical connection when depressed.
The Dryer Runs But Produces No Heat
A dryer that tumbles cold air is usually suffering from a break in the heating circuit or restricted airflow.
- Heating Element Assembly: Inside electric models, the wire coil of the heating element can snap. Replacing the assembly restores warmth to your cycles.
- Cycling Thermostat and High-Limit Thermostats: These sensors regulate internal temperatures. When they malfunction, power to the heating element is cut off prematurely or permanently.
The Drum Won't Turn While the Motor Runs
If you hear a hum but the drum stays still, the mechanical linkage between the motor and the drum has likely failed.
- Drive Belt: The rubber belt wraps around the drum and the motor pulley. If it snaps or wears thin, the motor will spin freely without turning the drum.
- Drum Rollers and Axles: Support rollers allow the drum to spin smoothly. If a roller seizes up or wears flat, it creates a loud rumbling noise and can stop the drum from turning altogether.
- Idler Pulley: This spring-loaded pulley maintains tension on the drive belt. A squeaking noise or a loose belt often points to a worn idler pulley.
How to Find the Correct Model Number
Video: Roper RED4516FW0 Dryer | Test

Never buy Roper clothes dryer parts based on guesswork or visual similarity alone. Even dryers that look identical on the outside can use different internal components depending on their exact manufacturing run.
To find the correct part numbers, you need your dryer’s specific model number. On most Roper models, the model and serial number sticker is located:
- On the inner rim of the dryer door opening.
- On the back panel of the dryer cabinet.
- Just inside the lint filter housing area.
Once you locate this alphanumeric code, plug it into a reputable parts supplier website or consult your owner’s manual. This ensures the replacement component matches your machine's voltage, dimensions, and mounting style.
Safety First: Preparing for the Repair
Dryer repairs are generally straightforward DIY projects, but electricity and heating elements demand respect. Before you touch a single component inside your machine, follow these crucial safety steps:
- Disconnect Power: Unplug the dryer from the wall outlet. For electric dryers, this means pulling a heavy 240-volt plug. For gas dryers, shut off the gas supply valve as well as unplugging the electrical cord.
- Clear the Workspace: Pull the dryer away from the wall to give yourself plenty of room to work. Vacuum out any accumulated lint around the exterior exhaust vent before opening the cabinet.
- Take Photos: As you remove panels and disconnect wires, take pictures with your smartphone. This serves as an invaluable reference guide when you are reassembling the machine.
OEM vs. Aftermarket Roper Dryer Parts
When shopping for replacement components, you will generally choose between OEM (Original Equipment Manufacturer) parts and aftermarket alternatives.
OEM parts are made by the original producer or under strict licensing guidelines. They guarantee a precise fit and match the exact performance standards of your dryer. While they sometimes cost slightly more, they offer peace of mind and longevity.
Aftermarket parts are produced by third-party manufacturers. They are often cheaper, but quality can vary significantly. For critical safety components—such as thermal fuses, thermostats, and gas valves—it is almost always best to stick with OEM specifications to prevent potential fire hazards.
Extending the Life of Your Roper Dryer
Once you install your new Roper clothes dryer parts, proper maintenance will keep them functioning for years to come. Clean the lint filter before or after every single load to maintain optimal airflow. Additionally, inspect your exterior exhaust vent annually to ensure it is free of lint blockages, bird nests, and crushed ducting. Good airflow prevents overheating, drastically reducing the wear and tear on thermal fuses, belts, and heating elements.