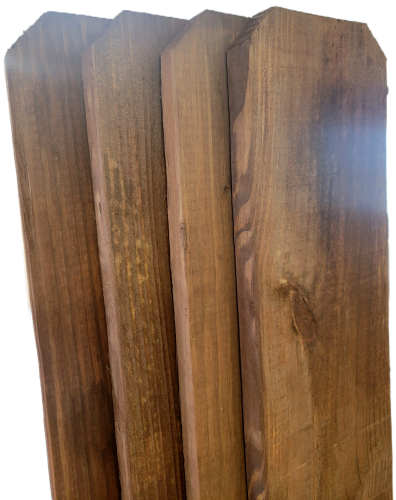
Guide to 1x6x6 Dog Ear Pickets: Specs & Tips
When planning a residential privacy fence, 1x6x6 dog ear pickets are by far the most popular and versatile building block on the market. They strike an ideal balance between cost, structural integrity, visual appeal, and ease of handling. However, building a fence that stands straight, resists rot, and withstands harsh weather requires more than simply buying a bundle of lumber and nailing it to a rail. You need to understand real-world sizing, wood species differences, fastener selection, and proper spacing.

Understanding 1x6x6 Dimensions and the Dog Ear Cut
In the lumber industry, "1x6x6" refers to nominal dimensions rather than actual measurements. Knowing the true dimensions is critical for calculating materials and planning post layouts:
- Thickness: Nominally 1 inch, but typically measures between 5/8 inch and 3/4 inch (most standard mass-market pickets are roughly 5/8 inch thick).
- Width: Nominally 6 inches, but actual width ranges from 5-3/8 inches to 5-1/2 inches.
- Height: 6 feet (72 inches), which represents the full vertical length from bottom edge to top peak.
The term "dog ear" refers to the two upper corners cut off at a 45-degree angle. While many homeowners assume this is purely decorative, the profile serves a functional purpose. Removing the sharp corners reduces end-grain exposure and eliminates the thinnest edge of the wood, which is where moisture, rot, and checking (cracking along the grain) tend to develop first. It also allows water to run off the top edge more efficiently than a completely flat cut.
Choosing the Best Wood Species for 1x6x6 Dog Ear Pickets
The performance, maintenance requirements, and overall lifespan of your fence depend largely on the wood species you choose. Here is how the most common materials compare.
Western Red Cedar
Western Red Cedar is widely considered the gold standard for fence boards. It contains natural tannins and oils that make it inherently resistant to rot, decay, and insect damage without chemical treatments. Cedar is structurally stable, meaning it experiences minimal warping, twisting, or cupping as it seasons. It also has a warm, reddish-brown tone and a pleasant aroma. The primary drawback is price: cedar generally costs significantly more than treated pine.
Pressure-Treated Pine (PTP)
Pressure-treated southern yellow pine is the most economical and widely available option. It is infused under pressure with chemical preservatives (such as micronized copper azole) to resist fungal decay and subterranean termites. It is strong and impact-resistant, making it a rugged choice. However, pine absorbs a substantial amount of water during treatment. As it dries in the field under direct sunlight, it is prone to shrinkage, twisting, and checking. Proper installation and prompt staining are essential to keep treated pine looking good over time.
Redwood
Common on the West Coast, redwood offers natural rot and bug resistance similar to cedar. Heartwood grades provide extraordinary longevity and deep color, while sapwood grades are lighter in color and slightly less durable. Redwood accepts stains exceptionally well and delivers a premium, high-end appearance, though it commands a premium price tag.
Whitewood (Spruce / Fir)
Often sold as an entry-level budget board, whitewood lacks natural decay resistance and has not been chemically treated. While inexpensive and easy to cut, untreated whitewood pickets can rot rapidly if exposed to sustained moisture or soil contact. They are generally only recommended for temporary fencing or dry, arid climates where regular sealing can be maintained religiously.
How to Calculate How Many Pickets You Need
Accurate material estimation prevents multiple trips to the lumberyard and prevents uneven spacing across your fence line. Since a nominal 6-inch picket actually measures roughly 5-1/2 inches wide, you cannot simply divide your linear footage by 0.5 feet.

Standard Privacy (Edge-to-Edge)
For a standard flat privacy fence where boards sit side-by-side:
- Determine the total linear footage of the fence line (e.g., 100 feet).
- Convert linear feet to inches: 100 ft × 12 = 1,200 inches.
- Divide by the picket width plus expected expansion or gap. For green (wet) pressure-treated wood, install them touching, as they will shrink roughly 1/8 to 1/4 inch; divide by 5.5 inches (1,200 ÷ 5.5 = 218.18 pickets). For dry cedar, leave a small 1/16 to 1/8 inch gap; divide by 5.625 inches (1,200 ÷ 5.625 = 213.33 pickets).
- Add a 10% waste factor for bowed, cracked, or unusable boards: 218 × 1.10 = 240 pickets.
Board-on-Board (Complete Privacy)
If you want zero gaps even after the lumber dries, use a board-on-board pattern. In this design, base boards are spaced roughly 3-1/2 to 4 inches apart, and an overlapping layer covers the seams with a 1-inch to 1-1/2-inch overlap on both sides. To calculate board-on-board requirements, multiply your total linear feet by 2.6 to 2.8, then add a 10% contingency.
Installation Best Practices for Lasting Results
Proper installation techniques are what separate a fence that stands straight for 20 years from one that fails in five. Follow these essential job-site practices:
1. Keep Pickets Off the Ground
Never install pickets directly in contact with grass, soil, or mulch. Even pressure-treated pickets rated for ground contact degrade much faster when perpetually exposed to soil microbes and moisture. Maintain a minimum clearance of 2 inches between the bottom of the picket and the finished grade. To achieve an even clearance line across uneven terrain, run a taut string line between corner posts before securing your first board.
2. Fasten with the Right Hardware
Hardware failure is one of the most common causes of fence problems. Never use plain steel or interior drywall screws; they will corrode rapidly and produce dark, unsightly tannin streaks on cedar and redwood.
- Nails: Use 1-3/4 inch to 2-inch hot-dipped galvanized or 304/316 stainless steel ring-shank nails. The ringed shanks provide the pull-out resistance needed to prevent warping boards from popping loose.
- Screws: Use 1-5/8 inch exterior-rated coated deck screws or stainless steel screws. Screws provide superior holding power over time and make board replacement much simpler if repairs are ever needed.
- Pattern: Fasten each picket with two fasteners at every horizontal rail (typically three rails for a 6-foot fence: top, middle, and bottom). Space the fasteners roughly 1 inch in from each edge to prevent splitting.
3. Rail Placement
A 6-foot fence should always utilize three horizontal 2x4 rails. Place the bottom rail roughly 8 to 10 inches above the bottom of the pickets, the top rail roughly 6 to 8 inches below the peak, and the middle rail centered evenly between them. This prevents the pickets from twisting or blowing out in heavy wind.
Finishing and Maintenance
Once installed, wood pickets require protection from ultraviolet (UV) radiation and moisture. Unfinished wood will oxidize over 6 to 12 months, turning a weathered silvery-gray while slowly checking and cracking on the surface.
If you installed pressure-treated lumber, allow it to dry before applying any finish. Test it by sprinkling drops of water onto the surface: if the water beads up, the wood is still too wet to accept a coating; if the water absorbs within a few seconds, the wood is ready for stain. Cedar can usually be finished sooner, provided it has had a few dry days post-installation.
Opt for a quality penetrating oil-based semi-transparent stain rather than exterior paint. Penetrating stains sink into the wood grain, conditioning the fibers and allowing moisture vapor to escape without peeling or blistering. Reapply stain every three to five years to keep your fence protected and looking new.