Maytag Bravos XL Dryer Thermal Fuse: Fix & Test
When you load wet laundry into your dryer, press the start button, and hear nothing but silence, a failed safety component is often the reason. In most instances, your maytag bravos xl dryer thermal fuse has blown. Designed as a vital defense mechanism against home fires, this small, inexpensive part protects your home by shutting down the appliance when internal temperatures exceed safe operating limits.

Fortunately, diagnosing and replacing a thermal fuse on a Maytag Bravos XL dryer is one of the most straightforward DIY appliance repairs you can perform. Below, you will find everything you need to identify the symptoms of a blown fuse, locate the component, test it with a multimeter, and correct the underlying issue so it does not fail again.
What Does the Thermal Fuse Do?
The thermal fuse is a heat-sensitive safety switch mounted directly onto the blower housing or heat duct of your dryer. Under normal operating conditions, an internal electrical contact remains closed, allowing electrical current to reach the drive motor.
If the exhaust temperature spikes—usually surpassing roughly 196°F (91°C)—the fuse trips to prevent the dryer from overheating and igniting trapped lint. Unlike a reusable circuit breaker or a cycling thermostat that opens and closes continuously, a thermal fuse is a one-time device. Once it blows, it permanently breaks the electrical circuit and must be discarded and replaced.
Symptoms of a Blown Maytag Bravos XL Dryer Thermal Fuse
How do you know the thermal fuse is the culprit rather than a failed control board, door switch, or drive belt? Look for these distinct symptoms:
- The dryer will not start at all: On most Maytag Bravos XL electric and gas models, the thermal fuse is wired in series with the drive motor. If the fuse blows, the control panel may still illuminate and respond to input, but pressing “Start” produces only a quiet click or complete silence.
- The dryer runs but produces no heat (select gas models): While electric Bravos models typically experience total motor shutdown, certain gas configurations route the thermal fuse through the burner circuit instead of the motor. The drum may tumble normally, but the igniter will never glow and the burner will never fire.
- Sudden shutoff during a hot cycle: If the dryer abruptly stopped mid-cycle with warm, damp clothes inside and refused to power back on, excessive heat buildup likely triggered the fuse.
Tools and Materials Needed for Repair
Before you begin, gather the following basic tools:
- 1/4-inch nut driver or socket
- 5/16-inch nut driver
- Digital multimeter (capable of testing resistance or continuity)
- Flathead screwdriver or putty knife
- Work gloves to protect your hands from sharp sheet metal
- Replacement thermal fuse (commonly OEM part WP3392519 or WP3977393, depending on your exact model number)
Step-by-Step: Locating and Testing the Thermal Fuse
1. Prioritize Safety
Always disconnect power before servicing any major appliance. Unplug the dryer from the wall outlet. If your dryer is hardwired, switch off the dedicated dual-pole breaker in your electrical service panel. If you are working on a gas model, turn the manual gas shutoff valve to the off position.
2. Access the Blower Housing
On Maytag Bravos XL dryers, the thermal fuse is mounted on the blower wheel housing located at the rear of the machine.
- Pull the dryer away from the wall to give yourself ample working room.
- Disconnect the rigid or semi-rigid exhaust duct from the dryer outlet.
- Using your 1/4-inch or 5/16-inch nut driver, remove the perimeter screws securing the large galvanized rear access panel.
- Carefully lift the rear panel away and set it aside. Note that the metal edges can be razor-sharp.
3. Identify the Thermal Fuse
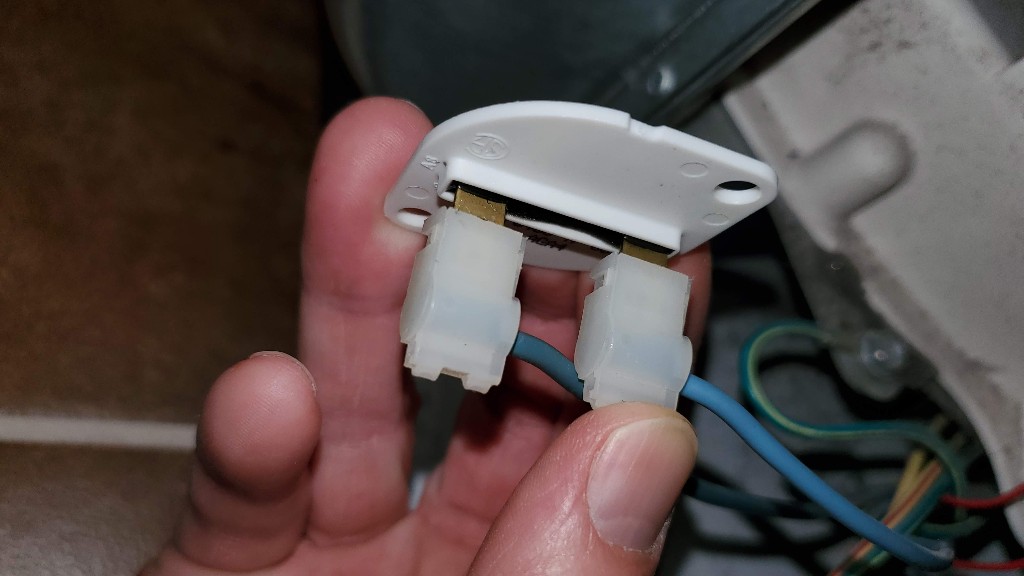
Look toward the bottom-left or bottom-center near the exhaust duct outlet. You will see the white plastic or metal blower housing. Mounted directly onto this housing is a small, oblong white plastic component roughly two inches long, secured by a single hex screw and connected to two blue or white wires. Do not confuse it with the nearby cycling thermostat, which is generally larger, round or oval, and held by two screws.

4. Test for Continuity
Visual inspection will not tell you if a thermal fuse has blown, as the internal link melts out of sight. You must test it with a multimeter:
- Gently slide the two slip-on wire connectors off the fuse terminals. Pull on the metal terminals, not the wires themselves, to avoid tearing the harness.
- Turn your digital multimeter to the lowest Ohms setting (Ω) or the audible continuity mode.
- Touch the meter’s red probe to one terminal and the black probe to the other.
Interpreting the reading: If the meter displays near zero Ohms (or beeps continuously), the fuse has continuity and is functioning correctly. If the screen displays “OL” (open loop), “1,” or shows infinite resistance, the fuse has blown and must be replaced.
How to Replace the Thermal Fuse
If your test confirms the fuse is dead, replacement takes only a couple of minutes:
- Use your nut driver to remove the single mounting screw securing the blown fuse to the blower housing.
- Remove the bad fuse and discard it.
- Position the new thermal fuse in the same orientation, sliding any locating tabs into their slots.
- Drive the mounting screw in firmly. Avoid over-tightening, as the plastic bracket can crack.
- Reattach the two wire leads. Because this is a simple non-polarized single-pole switch, it does not matter which wire goes to which terminal.
- Reinstall the rear metal panel, reconnect the exhaust vent, plug the dryer back in, and run a short test cycle.
The Critical Next Step: Why Did the Fuse Blow?
A thermal fuse rarely blows without an external cause. Installing a new fuse without addressing the reason for the failure almost guarantees the replacement will blow during your next few loads of laundry.
Clear Exhaust Vent Obstructions
Restricted airflow is responsible for over 90% of blown thermal fuses. When lint, bird nests, or crushed ductwork prevent hot air from escaping, the blower housing overheats rapidly. Disconnect your entire vent run from the wall to the exterior hood. Clean it thoroughly using an expandable dryer vent brush kit or a high-powered blower.
Inspect the Lint Screen and Housing
Fabric softeners and dryer sheets leave an invisible, waxy film on the fine mesh of the lint trap over time. Remove the screen and wash it under warm running water with liquid dish soap and a soft brush. If water pools on the mesh instead of passing straight through, airflow is severely restricted. Also, use a vacuum crevice tool to clear lint trapped deep inside the lint chute cavity below the filter.
Check the Heating Element
On electric models, a heating element coil can sometimes warp, sag, and touch the metal housing chamber. This creates a “grounded element,” causing the coil to heat continuously at full wattage regardless of thermostat commands. If your new fuse blows quickly even with a clean vent line, inspect the heating element for physical contact with the metal casing.
Final Thoughts
Diagnosing a blown thermal fuse on your Maytag Bravos XL dryer may seem intimidating, but it requires only basic hand tools and a few minutes of your time. By confirming continuity, replacing the part with an authentic OEM component, and thoroughly clearing your exhaust ducts, you can restore your dryer to peak performance while keeping your household safe.